Kubernetes Architecture: From Container Images to Running Pods
TL;DR
- Kubernetes Architecture: A distributed system with two main node types: the control plane (manages the cluster state) and compute nodes (run application containers).
- Control Plane Components: The core components include kube-apiserver (the central API), etcd (the cluster's data store), kube-scheduler (assigns pods to nodes), and kube-controller-manager (maintains the desired state).
- Compute Node Components: Key components on each worker node are the kubelet (node agent), kube-proxy (manages network rules), and a container runtime (like containerd or CRI-O) that runs the containers.
- Interaction Flow: Users interact with the cluster via kubectl, which sends requests to the kube-apiserver. The control plane then orchestrates the creation and management of pods on the compute nodes.
- High Availability (HA): Production-ready clusters use a multi-master, multi-node setup to eliminate single points of failure by replicating both control plane and compute resources.
- Imperative vs. Declarative: You can manage Kubernetes imperatively (direct commands like kubectl run) or declaratively (defining state in YAML files and using kubectl apply), with the declarative approach being best for version control and repeatability.
A Kubernetes cluster orchestrates containerized applications by coordinating compute, networking, and storage across a dynamic group of machines. Understanding its architecture is key to effectively managing distributed microservices. The entire system is built from several distributed components, each with a specific role in bringing a container from a static image to a running Pod.
What Does "Kubernetes" Mean?
The name Kubernetes comes from the Greek word “kubernētēs,” which translates to helmsman or pilot. This name reflects the platform's core function: steering and orchestrating containerized applications, much like a helmsman guides a ship.
Within the tech community, Kubernetes is often shortened to "K8s." This abbreviation comes from counting the eight letters between the "K" and the "s." It’s a convenient shorthand that simplifies communication within the Kubernetes ecosystem.
Control Plane vs. Compute Nodes
A Kubernetes cluster runs on a collection of Linux machines, referred to as nodes. A node can be a physical server or a virtual machine, like an AWS EC2 instance. There are two primary types of nodes in a Kubernetes cluster:
- Control Plane Nodes: These nodes manage the overall state of the cluster.
- Compute Nodes: These nodes run the actual application containers.
The Shift from Master/Worker Terminology
You may still see the terms "master nodes" and "worker nodes" in older documentation. This terminology described a traditional hierarchy where a "master" assigned tasks to "worker" nodes. However, to use more inclusive and accurate language, the Kubernetes community has adopted new terms.
- Control Plane Node (or controller node) now refers to the components that manage the cluster's state.
- Compute Node (or simply node) refers to the machines that execute application workloads.
The control plane is responsible for maintaining the desired state of the cluster, while compute nodes are responsible for running your containerized applications.
An Overview of Kubernetes Components
Kubernetes is a distributed application composed of several smaller, independent projects written in the Go programming language. To create a functional Kubernetes cluster, each of these components must be installed, configured, and able to communicate with one another.
For local development or testing, it's acceptable to install all components on a single machine. In a production environment, however, these components should be distributed across multiple hosts to achieve high availability, load balancing, and scalability.
Distributing components offers two main advantages:
- Fault Tolerance: If one server goes down, the entire cluster remains operational.
- Scalability: Individual components can be scaled independently without affecting others, making it easy to add more capacity.
Each Kubernetes component has a clearly defined responsibility. Understanding these roles is essential for grasping how Kubernetes works. Components are deployed to either a control plane node or a compute node, depending on their function.

You don't interact directly with compute nodes to launch containers. Instead, you send instructions to the control plane, which then delegates the container creation and management tasks to the appropriate compute nodes on your behalf.
The distributed nature of Kubernetes means control plane components can be spread across multiple machines for maximum fault tolerance. Compute nodes are standard machines with a supported container runtime, and you can easily add more to the cluster to increase computing power.
By separating control plane and compute components, you build a highly available and scalable cluster. Kubernetes was designed with cloud-native principles in mind—its components are stateless, easy to scale, and built for distribution.
When Kubernetes is part of a distribution like Amazon EKS or Red Hat OpenShift, additional components may be present, or default behaviors might differ. This guide focuses primarily on vanilla Kubernetes, whose core components are the backbone of every distribution.
Most Kubernetes-native components start with the prefix kube-. Two critical external dependencies do not:
- etcd: A third-party distributed key-value store that holds the cluster's state.
- Container Engine: A third-party runtime like
containerdorCRI-Othat runs the containers.
You rarely need to install these components manually. For development, tools like minikube create a single-node cluster on your local machine. For production, managed services like Amazon EKS or Google GKE provide pre-configured clusters. For on-premises setups, kubeadm is a popular installation utility.
For a deeper educational experience, Kelsey Hightower's Kubernetes the Hard Way tutorial guides you through a manual installation on bare Linux machines. While challenging, it provides invaluable insight into the inner workings of Kubernetes.
Control Plane Components
Control plane components are responsible for managing the cluster's state and are installed on control plane nodes. As an administrator, you interact with these components to manage the cluster.
kube-apiserveretcdkube-schedulerkube-controller-managercloud-controller-manager
Compute Node Components
Compute node components run on every node and are responsible for running Pods and interacting with the container runtime. You do not interact with these components directly.
kubeletkube-proxycontainer runtime
Add-On Components
Add-ons use Kubernetes resources like Deployments and DaemonSets to implement cluster-level features. They typically run in the kube-system namespace.
- DNS: For cluster-wide service discovery.
- Web UI (Dashboard): A graphical interface for managing the cluster.
- Container Resource Monitoring: Tools for collecting metrics and monitoring performance.
- Cluster-Level Logging: Solutions for aggregating logs from all nodes and containers.
- Network Plugins: CNI plugins that provide pod networking capabilities.
The Control Plane in Managed Kubernetes
Cloud services like Amazon EKS and Google GKE manage the control plane for you. They abstract away the complexity of installing and configuring components like kube-apiserver, etcd, and kube-scheduler, providing you with a stable API endpoint to interact with your cluster.
A Closer Look at Control Plane Components
Let's explore the responsibilities of each control plane component.
kube-apiserver
The kube-apiserver is the heart of the Kubernetes control plane. It exposes the Kubernetes API, a RESTful interface that serves as the front end for all cluster operations. Whether you use kubectl, a dashboard, or direct API calls, every interaction goes through the kube-apiserver.
It is a stateless Go application, and its source code is available on GitHub. To instruct Kubernetes, you send an HTTP request to a kube-apiserver endpoint. It is the single entry point for all create, update, and delete operations.
The kube-apiserver uses the REST standard, which makes it highly extensible. New functionality can be added by introducing new API resources and endpoints. To maintain the state of these resources, kube-apiserver relies on an external datastore. While some APIs store data in memory, this creates a stateful service that cannot be scaled. Kubernetes solves this by using etcd.
Key properties of the kube-apiserver as a REST API:
- Relies on the HTTP protocol.
- Defines resources identified by URL paths (e.g.,
/api/v1/pods). - Uses HTTP methods (
GET,POST,PUT,DELETE) to specify actions. - Stores the state of its resources in an external datastore (
etcd).
Because kube-apiserver is stateless, it can be scaled horizontally by deploying multiple instances behind a load balancer. This ensures high availability and performance.
Some of the core resources exposed by the API server include:
PodReplicaSetDeploymentPersistentVolumeNetworkPolicy
You can find a full list of API resources in the official Kubernetes API reference.
Notice there is no "container" resource. Kubernetes abstracts containers using a resource called a Pod. A Pod can hold one or more containers, though a single-container Pod is the most common use case.
When an object is created via the API, it is stored in etcd. Other Kubernetes components then work to bring the cluster's actual state in line with this new desired state. The kube-apiserver is the central hub and the single source of truth for the entire cluster.
How to Run kube-apiserver
The recommended way to run kube-apiserver is as a container, managed as a static Pod. It should be deployed on dedicated control plane nodes. If the API server becomes inaccessible, your running containers will continue to function but will become "orphans," as they can no longer be managed by Kubernetes.
As a cluster scales, the number of requests to kube-apiserver from other components increases. Therefore, it's crucial to scale the API server independently to handle the load.
The etcd Datastore
The kube-apiserver is stateless and relies on etcd to store the cluster's state. etcd is an open-source, distributed key-value store designed for consistency and high availability. While it's a separate project maintained by the etcd-io community, it is a critical dependency for Kubernetes.
Some lightweight Kubernetes distributions like K3s can use alternatives like SQLite or even external databases like MySQL, but etcd is the standard for most clusters.
Every read or write operation made through the Kubernetes API results in a corresponding operation on the etcd datastore.
etcd is the brain of your cluster. If you lose its data without a backup, your cluster is irrecoverable. For this reason, direct interaction with etcd is strongly discouraged. All other components must go through the kube-apiserver to read or write data, as the API server handles authentication, authorization, and validation.
When you run a command like kubectl run nginx --image nginx, kubectl sends an HTTP POST request to the kube-apiserver. The API server validates the request and writes a new entry to etcd. This changes the cluster's desired state, and other components then work to reconcile the actual state with this new record.
Unlike in-memory stores like Redis, etcd persists data to disk, so the state is not lost on reboot.
Where to Run etcd
etcd can be run in a container or as a systemd service. It can be deployed in two main ways:
- Stacked:
etcdis deployed on the same control plane nodes as other control plane components. This is the simpler and more common setup. - External:
etcdis deployed on a dedicated, separate cluster. This offers more reliability for demanding environments but adds complexity.
For more details, refer to the official documentation on operating etcd clusters for Kubernetes.
kube-scheduler
The kube-scheduler is responsible for assigning newly created Pods to available compute nodes. When a Pod is first created, it is considered "unscheduled" because its nodeName property in etcd is empty.
The kube-scheduler constantly watches the kube-apiserver for Pods in a pending state. When it finds one, it runs a complex algorithm to select the best node for that Pod. This decision is based on factors like:
- Resource availability (CPU, memory)
- Node selectors and affinity/anti-affinity rules
- Taints and tolerations
- Pod priority and preemption
Once a node is selected, the scheduler updates the Pod's nodeName property via an API call. At this point, the Pod is considered "scheduled," and the kubelet on the assigned node takes over.
You can also implement a custom scheduler to replace the default one, which is a key strength of Kubernetes' modular architecture.
Where to Install kube-scheduler
The kube-scheduler is a lightweight process that should run on the control plane nodes. For high availability, you should run multiple instances. If the scheduler is down, new Pods will remain in a pending state, but already scheduled Pods will not be affected.
kube-controller-manager
The kube-controller-manager is a single binary that runs multiple controller processes. Each controller is responsible for a specific resource and runs a "reconciliation loop" to ensure the cluster's actual state matches the desired state stored in etcd.
For example, if a Pod managed by a ReplicaSet fails, the Replication Controller will detect the discrepancy between the desired replica count and the actual count. It will then make an API call to create a new Pod to replace the failed one.
Some of the key controllers bundled in kube-controller-manager include:
- Node Controller: Manages the lifecycle of nodes.
- Replication Controller: Ensures the correct number of Pod replicas are running.
- Deployment Controller: Manages the rollout of new application versions.
- StatefulSet Controller: Manages stateful applications.
- DaemonSet Controller: Ensures a Pod runs on every node in the cluster.
- Job Controller: Manages batch jobs that run to completion.
- Service Account Controller: Manages ServiceAccounts for Pods.
Where to Run kube-controller-manager
Like other control plane components, kube-controller-manager runs on the control plane nodes, either as a container or a systemd service.
cloud-controller-manager
The cloud-controller-manager is a component that integrates Kubernetes with a specific cloud provider's API. It runs controllers that are specific to the underlying cloud infrastructure, such as managing nodes, volumes, and load balancers.
If you are running Kubernetes on-premises or in a local learning environment, your cluster will not have a cloud-controller-manager.
Cloud-specific controllers include:
- Node Controller: Checks if a node deleted in the cloud has stopped responding.
- Route Controller: Sets up network routes in the cloud infrastructure.
- Service Controller: Creates, updates, and deletes cloud provider load balancers for Kubernetes Services.
Where to Run cloud-controller-manager
The cloud-controller-manager runs on the control plane nodes alongside other control plane components.
A Closer Look at Compute Node Components
Now let's take a look at the components that run on every compute (worker) node.
Container Engine and Container Runtime
A container runtime is the low-level software that executes containers. A container engine is a higher-level platform that builds on a runtime to provide features like image management and a user-friendly interface.
- Container Runtimes (Low-Level):
runc,containerd - Container Engines (High-Level): Docker, Podman, CRI-O
While Docker was the original default for Kubernetes, the ecosystem has shifted towards runtimes that adhere to the Container Runtime Interface (CRI). CRI is a plugin interface that allows the kubelet to communicate with various container runtimes without needing custom integrations.
Popular CRI-compliant runtimes include:
- containerd: A lightweight and focused runtime.
- CRI-O: A runtime designed specifically for Kubernetes.
Using a CRI-native runtime is now the recommended approach, as the direct Docker integration (via dockershim) was removed in Kubernetes v1.24. However, Docker-built images are still fully compatible with any OCI-compliant runtime.
The Open Container Initiative (OCI) defines open standards for container formats and runtimes, ensuring interoperability across the ecosystem.
| Runtime | Path to Unix Domain Socket |
|---|---|
| containerd | unix:///var/run/containerd/containerd.sock |
| CRI-O | unix:///var/run/crio/crio.sock |
| Docker Engine (using cri-dockerd) | unix:///var/run/cri-dockerd.sock |
Table 2.1: Known container runtime endpoints for Linux machines
kubelet
The kubelet is the primary agent that runs on each node in the cluster. It is responsible for ensuring that containers described in PodSpecs are running and healthy. The kubelet does not run in a container; it runs as a system daemon directly on the host machine.
The kubelet acts as a bridge between the kube-apiserver and the local container runtime. It periodically polls the API server to get the list of Pods that have been scheduled to its node.
When it receives a Pod specification, the kubelet translates it into instructions for the local container runtime (e.g., containerd) via its UNIX socket, which then starts the required containers. The kubelet's sole job is to ensure the state of containers on its node reflects the desired state in etcd.
A few key points about kubelet:
- It communicates with
kube-apiserver, not directly withetcd. - Communication requires HTTPS port 6443 to be open between compute and control plane nodes.
- It interfaces with the local container runtime via a UNIX socket.
Manually creating containers on a worker node is possible but not recommended, as the kubelet will not manage them. Exposing the container runtime socket to workloads is a major security risk and should be avoided.
The kube-proxy Component
The kube-proxy is a network proxy that runs on each node and is a fundamental part of the Kubernetes networking model. It maintains network rules on nodes, which allow for network communication to your Pods from inside or outside the cluster.
kube-proxy implements Kubernetes Services, which are an abstraction for exposing an application running on a set of Pods. Like the kubelet, kube-proxy communicates with the kube-apiserver to get information about Services and Endpoints.
Using kubectl and YAML to Manage Kubernetes
kubectl is the official command-line tool for interacting with a Kubernetes cluster. It is an HTTP client optimized for making calls to the kube-apiserver.
While you could technically use curl to interact with the API, kubectl simplifies this process. It handles authentication, manages cluster contexts, and provides easy-to-remember commands for complex operations. Mastering kubectl is essential for being effective with Kubernetes.
How kubectl Works
When you run a kubectl command, it reads a configuration file called kubeconfig, which is typically located at $HOME/.kube/config. This file contains:
- The URL of the
kube-apiserver. - User credentials (e.g., client certificates or tokens).
- Contexts, which map a user to a cluster.
With a kubeconfig file, you can easily switch between different clusters and user accounts. You can override the default path using the KUBECONFIG environment variable or the --kubeconfig flag.
To view your current configuration, run:
kubectl config view
In the configuration below, you can see several key sections:
-
Clusters: Defines each Kubernetes API endpoint you can reach, including its URL (
server) and TLS trust method (certificate-authority-dataorinsecure-skip-tls-verify). -
Users: The
userssection holds your credentials for each cluster. This can include client certificates (client-certificate-dataandclient-key-data) or tokens. These are essential for authenticating you with the Kubernetes API.- For
user-admin, a client certificate and key is used (<CLIENT_CERT_DATA_PLACEHOLDER>,<CLIENT_KEY_DATA_PLACEHOLDER>), which represent Base64-encoded data. - For
user-readonly, a token is used instead.
- For
-
Contexts: Associates a
cluster, auser, and optionally anamespaceinto named contexts. Selecting a context determines wherekubectlsends requests and using which credentials. -
Current-Context: Indicates which context is active for
kubectl. In the example, it points todev-admin@cluster-one, which ensures subsequent commands target that cluster, user, and namespace.
apiVersion: v1
clusters:
- cluster:
    certificate-authority-data: <CA_DATA_PLACEHOLDER>
    server: https://cluster-one.example.com
  name: cluster-one
- cluster:
    insecure-skip-tls-verify: true
    server: https://cluster-two.example.com
  name: cluster-two

contexts:
- context:
    cluster: cluster-one
    user: user-admin
    namespace: dev
  name: dev-admin@cluster-one
- context:
    cluster: cluster-two
    user: user-readonly
    namespace: prod
  name: prod-readonly@cluster-two

kind: Config
preferences: {}

current-context: dev-admin@cluster-one
users:
- name: user-admin
  user:
    client-certificate-data: <CLIENT_CERT_DATA_PLACEHOLDER>
    client-key-data: <CLIENT_KEY_DATA_PLACEHOLDER>
- name: user-readonly
  user:
    token: <TOKEN_PLACEHOLDER>
When you run kubectl get pods, the tool sends an HTTP GET request to the /api/v1/pods endpoint on the kube-apiserver. The server responds with data from etcd, which kubectl then formats into a human-readable table.
Imperative vs. Declarative Syntax
There are two main ways to interact with Kubernetes using kubectl:
1. Imperative Commands
Imperative commands directly tell the cluster what to do. They are quick, easy to type, and great for one-off tasks or inspecting cluster resources.
# Create a Pod named my-pod from the busybox image
kubectl run my-pod --restart Never --image busybox:latest

# List all ReplicaSets in the my-namespace namespace
kubectl get rs -n my-namespace

# Delete the Pod named my-pod
kubectl delete pod my-pod
The main drawback of the imperative approach is that it's difficult to track changes or reproduce a cluster's state.
2. Declarative Configuration
The declarative approach involves defining the desired state of your resources in a manifest file, typically written in YAML. You then apply this file to the cluster, and Kubernetes works to achieve that state.
YAML ("YAML Ain't Markup Language") is a human-readable data serialization format. It is not a programming language but a way to define configuration using key-value pairs.
Here is the declarative equivalent of the imperative kubectl run command from before:
# pod.yaml
apiVersion: v1
kind: Pod
metadata:
  name: my-pod
spec:
  containers:
  - name: busybox-container
    image: busybox:latest
To create the Pod from this file, you run:
kubectl apply -f pod.yaml
Every Kubernetes manifest must contain four top-level keys:
apiVersion: The version of the Kubernetes API you're using to create this object (e.g.,v1,apps/v1).kind: The type of resource you want to create (e.g.,Pod,Deployment,Service).metadata: Data that helps uniquely identify the object, including itsname.spec: The desired state of the object, including details like container images, ports, and replicas.
The declarative approach enables Infrastructure as Code (IaC). You can store your YAML files in a Git repository, track changes over time, and easily recreate your applications. You can also define multiple resources in a single file, separated by ---.
You don't need to memorize the entire YAML syntax. The kubectl explain command is a powerful tool for inspecting the fields of any resource:
kubectl explain pod.spec.containers.image
Architecting for High Availability
Kubernetes is a distributed system designed for resilience. How you structure your cluster determines its level of availability.
Single-Node Cluster
A single-node cluster runs all control plane and compute components on a single machine. This setup is ideal for local development and testing but is not suitable for production. Tools like minikube make it easy to create a single-node cluster.
| Pros | Cons |
|---|---|
| Good for testing and development | Impossible to scale |
| Easy to set up locally | Not highly available |
| Supported by tools like minikube | Not recommended for production |
Table 2.2: Pros and cons of single-node Kubernetes clusters
Single-Master, Multi-Node Cluster
This setup features one control plane node and multiple compute nodes. It provides high availability for your applications, as they can be distributed across multiple machines. However, the control plane itself remains a single point of failure.
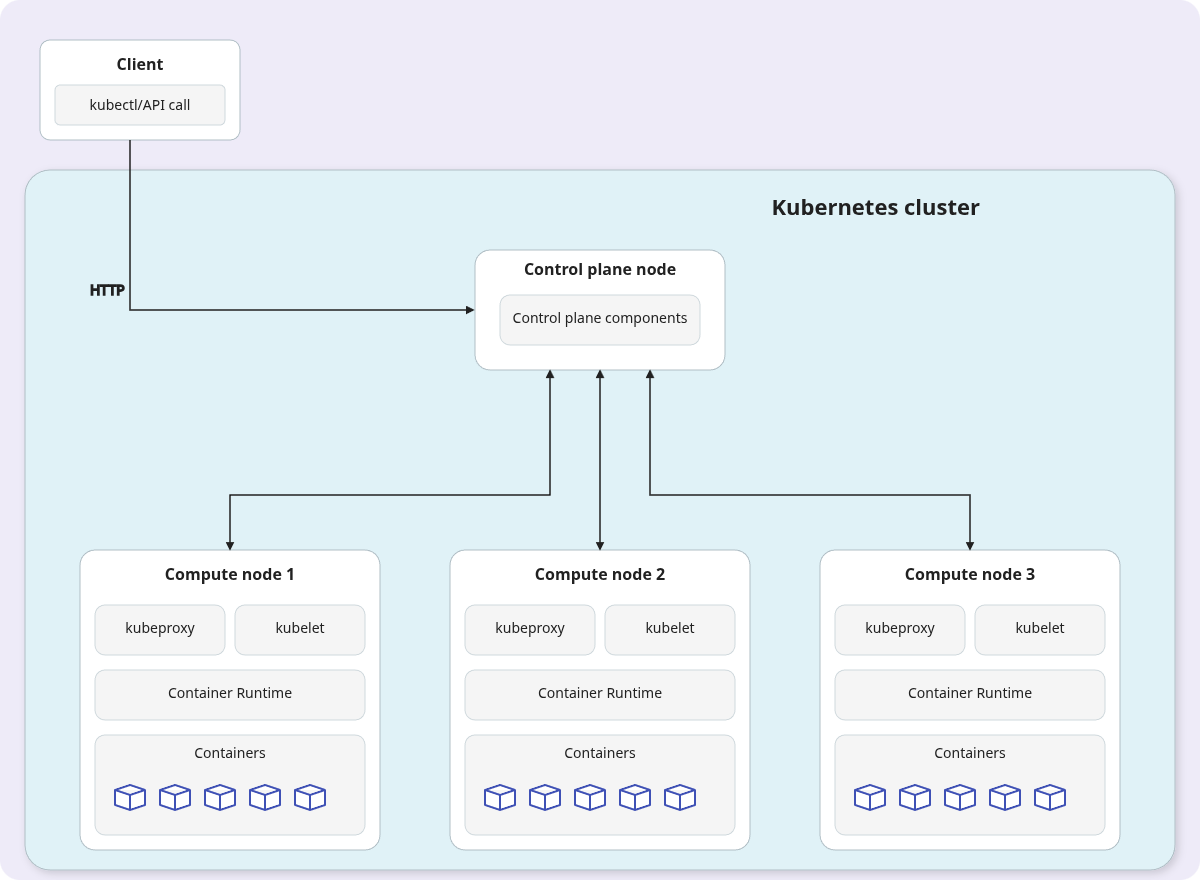
If the control plane node fails, you lose the ability to manage the cluster, and the etcd instance running on it is at risk. This setup also has scaling limitations, as a single kube-apiserver can become a bottleneck.
| Pros | Cons |
|---|---|
| High availability for applications | Control plane is a single point of failure |
| Supports multi-node features | Single etcd instance is at risk |
Can be run locally with kind | Cannot scale the control plane effectively |
Table 2.3: Pros and cons of a single-controller, multi-compute cluster
Multi-Master, Multi-Node Cluster
This is the recommended architecture for production environments. It features multiple control plane nodes and multiple compute nodes, eliminating single points of failure for both the control plane and applications.
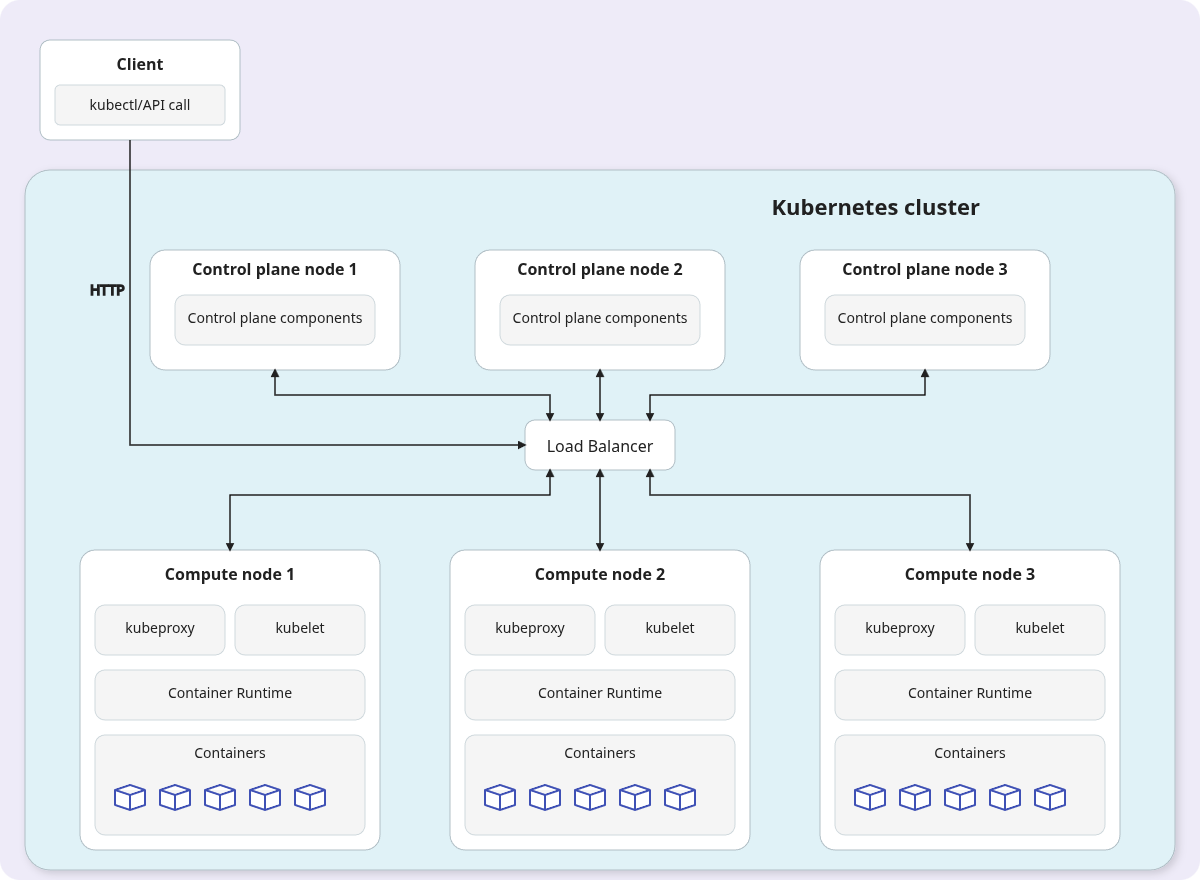
In this setup, a load balancer distributes traffic across the kube-apiserver instances. Each control plane node runs its own etcd instance, and these instances form an etcd cluster among themselves. They use the Raft consensus algorithm to replicate data and elect a leader, ensuring the cluster state remains consistent and available even if a control plane node fails.
Managed Kubernetes services like Amazon EKS and Google GKE provision this type of highly available cluster by default.
Summary of Kubernetes Components
This table summarizes the core components and their roles in the Kubernetes architecture.
| Component Name | Communicates With | Role |
|---|---|---|
kube-apiserver | kubectl, etcd, kube-scheduler, kube-controller-manager, kubelet, kube-proxy | The central REST API. It is the only component that communicates directly with etcd to read and write the cluster state. |
etcd | kube-apiserver | The distributed key-value store that holds the state of the Kubernetes cluster. |
kube-scheduler | kube-apiserver | Watches for unscheduled Pods and assigns them to a suitable compute node by updating the Pod's nodeName property. |
kube-controller-manager | kube-apiserver | Runs reconciliation loops to ensure the actual state of the cluster matches the desired state stored in etcd. |
kubelet | kube-apiserver and container runtime | The agent on each node that ensures containers in Pods are running and healthy by interacting with the local container runtime. |
kube-proxy | kube-apiserver | Manages network rules on each node to enable Kubernetes networking and Services. |
| Container Engine | kubelet | The software that runs containers based on instructions from the local kubelet. |
Table 2.4: Kubernetes components and their responsibilities
Frequently Asked Questions (FAQ)
What are the main components of the Kubernetes control plane?
The main components of the Kubernetes control plane are the kube-apiserver, etcd, kube-scheduler, and kube-controller-manager. Together, they manage the overall state of the cluster, schedule applications, and respond to cluster events.
What is the difference between a control plane node and a compute node?
A control plane node runs the components that manage the Kubernetes cluster, acting as the brain of the system. A compute node (or worker node) is responsible for running the actual application containers as instructed by the control plane.
What is the role of the kubelet?
The kubelet is an agent that runs on every node in the cluster. Its primary job is to ensure that the containers specified in Pods assigned to its node are running and healthy. It communicates with the kube-apiserver for instructions and the local container runtime to manage containers.
Why is etcd so important in Kubernetes?
etcd is the distributed key-value store that serves as the single source of truth for a Kubernetes cluster. It stores all configuration data and state information, including details about nodes, Pods, Services, and Deployments. Losing etcd data without a backup means losing the state of the entire cluster.
What is the difference between imperative and declarative management in Kubernetes?
Imperative management involves using direct commands (e.g., kubectl run) to tell the cluster what to do. It's fast for simple tasks. Declarative management involves defining the desired state in a YAML file and applying it (e.g., kubectl apply -f). Kubernetes then works to achieve that state. This method is better for managing complex applications and implementing Infrastructure as Code (IaC).